Looking to set up your Twitch channel for the first time with OBS or migrate an existing channel from other software like Streamlabs? This guide will help you with the basics to get up and running using the open-source software OBS Studio. The software can seem overwhelming at first but once you know the basics, it's actually quite manageable.
There are many ways to set up a Twitch channel. This guide is based on the fairly simple setup I use on my channel.
Things you will need:
- Twitch stream key – A stream key is a unique alphanumeric code that identifies your channel; you'll need it to set up your Twitch channel with OBS. You can find your stream key in your Twitch stream settings under “Stream Key & Preferences”
- OBS Studio – This is a piece of open-source software that you will use to control your stream. If you've used Streamlabs before, it will look familiar to you because Streamlabs' software is actually a modified version of OBS. You can find OBS Studio here: Download | OBS (obsproject.com)
- StreamElements – A web-based service that provides tools for setting up your channel overlay and interactive elements that go with it such as alerts, chat logs, and bots.
- Image editing software (optional but very helpful) – If you want to create custom overlays, emotes, or avatars you'll need software that allows you to make PNG image files with a transparent background. MS Paint won't work for this but cheap or free options include GIMP, Paint.net, Canva, and Medibang.
Note: While you're in your Twitch settings looking for your stream key, check your VOD Settings as well. Make sure “store past broadcasts” is enabled if you would like recordings of your streams to be visible on your channel. By default this option is disabled.
OBS setup
Initial configuration
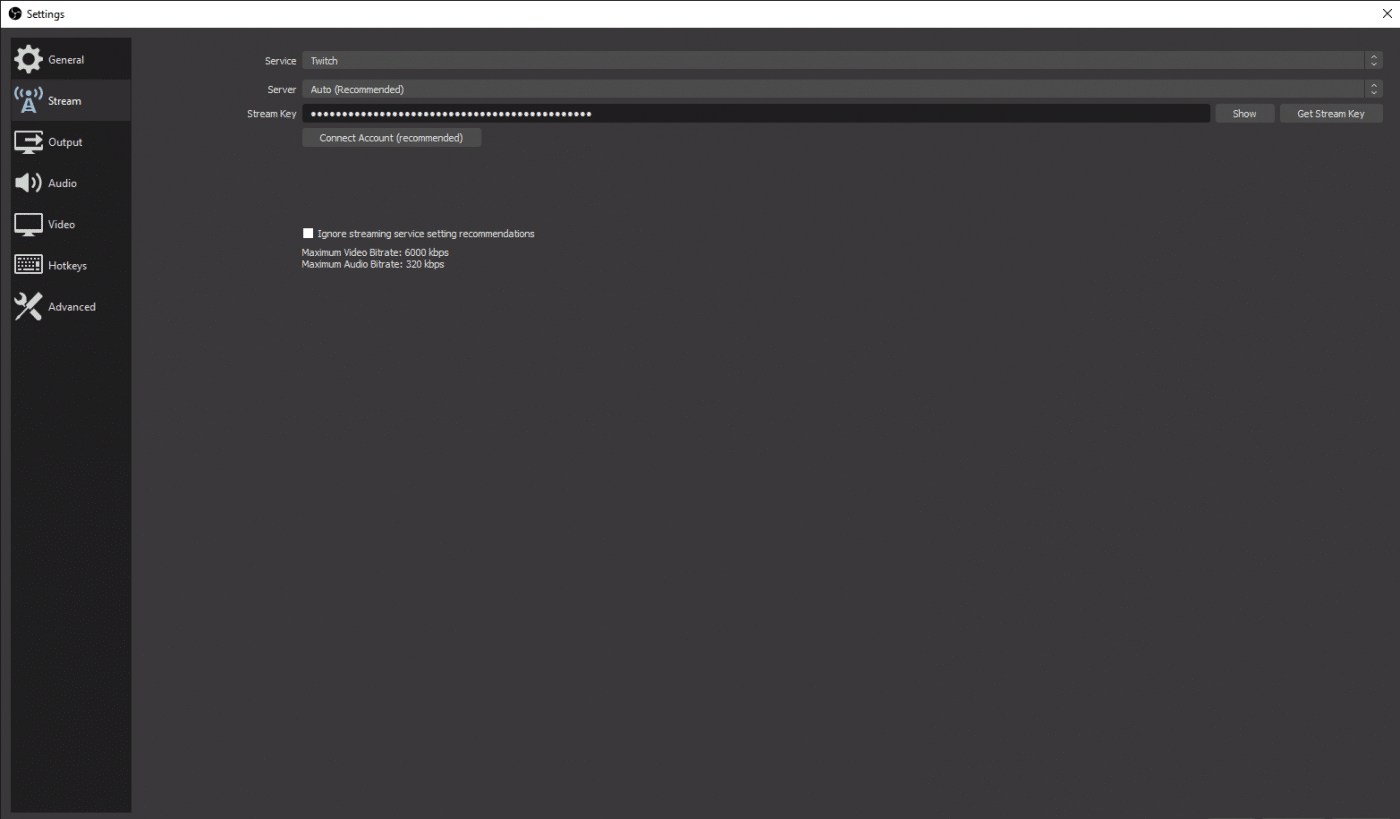
Before you can do any customization, you need to need to input a few basic settings. Start off by selecting Twitch as your service and inputting your stream key in Settings > Stream (Figure 1). You can either paste it in from Twitch or import it by connecting your account. On this same screen, you can also manually select a server. For most people, using the Auto option works fine. If you find that the automatic option produces a choppy stream, you can manually select a specific server. I use a tool called Twitch Test (Figure 2) to determine which server will give me the best performance.

Another basic setting you'll want to tackle right away is your audio input device selection. To do this, go to Settings > Audio. Select your microphone under the “Mic/Auxiliary Audio” dropdown. Beware that doing this will make your mic enabled on all your scenes by default (see next section for more about scenes).
If you only want the mic enabled for specific scenes select Disabled on this screen (Figure 3). For all the other audio devices, select Disabled.

The last settings to check are in the Video section. This is where you'll select your base resolution, output resolution, and frame rate. Since Twitch limits the resolution and frame rate of your streams regardless of your settings, there is little to gain from selecting any resolution above 1080 and any frame rate above 60. The settings I use can be seen in Figure 4.
For all other OBS settings, the default settings should work fine for most situations. However, if you find that you have choppy streams even when using the best server for your area, you may need to adjust your bitrate or other stream output settings. Check out Twitch's setup guide for troubleshooting and recommended settings.

Creating OBS scenes
Scenes are how OBS saves your channel's layout. While you only need one scene to get started, most streamers switch through several scenes during a stream depending on the situation. I recommend creating the following:
- Starting Soon – This is a scene you'll use when you're live but still making adjustments. I keep my mic on for this one but hide pretty much everything else.
- Gameplay – You'll spend most of the time in this scene. Your game screen will be visible, your mic will be on, and your camera will be live (if you have one). If you only want to create one scene, this is the one you need.
- Break – If you're running a long stream you'll inevitably need to step away. The safest option here is to have all your inputs disabled for this one (especially if your bathroom is right next to the room you're streaming from). Since I sometimes like to talk while on break, I have my mic enabled but mute it when I switch to this scene.
- Sign-off – This one is totally optional, but I like to end my streams with a screen that hides my game screen and shows my schedule.
To create a scene, click the + button in the Scenes panel in the bottom left corner of the OBS screen. After you've input a name for your scene, you need to start adding sources.
Adding Sources to OBS
In OBS, everything the audience can see or hear is called a “source”. For the purpose of this guide, I'll cover how to make a basic gameplay scene for streaming PC games.
Your new scene will start as a black rectangle with no sources. To add sources, click the + button in the bottom center of the OBS window. You'll then input a name for each source and click “Create New”. For a gameplay scene, you'll need to add the following sources:
- Audio Output Capture – This allows your audience to hear the game audio. When you click to add this, a window will appear that asks you to select a device; choose your headphones. Once you add this, an Audio Output Capture volume bar will appear in Audio Mixer panel at the bottom of the OBS window.
- Game Capture – There are a few different ways to do this. The Game Capture and Window Capture options require you to select a specific window to share. If you don't have the game running when you set this up, you'll have to to select the targeted window later. Between these two options, Game Capture tends to work better for modern games and Window Capture works better for retro games. However, the easiest option is to use Display Capture. If you opt for this, make sure there isn't anything on your screen that you don't want your audience to see since this option will share your entire desktop.
- Video Capture Device – If you will be using a webcam on your stream, add it as a video capture source. If you are streaming console games rather than PC games, you can also add your capture card using this method to share your console's screen.
- Audio Input Capture – If you selected your mic as a global source at the start of this guide, you can skip adding this source. If you disabled your mic in OBS's global audio settings, add it as an audio input capture source to get your mic volume to appear in the Audio Mixer panel.
At this point, it's a good idea to test what you have set up. Try playing some music with your headphones and talking into your mic; the green volume bars for Audio Output Capture and Audio Input Capture should move. For your video sources, you should see a box appear that shows your webcam (if you added one).
If you are using Window Capture or Game Capture, nothing will be visible for those yet. If you are using Display Capture, your desktop will be visible. Don't worry about positioning anything on the screen yet, we'll handle this after doing the StreamElements setup. See Figure 5 for an example of how your OBS scene will look at this stage.
Note: There are other types of sources that can be added in OBS, such as images and text, but for the purpose of this guide, we'll handle this via StreamElements.

StreamElements Setup
StreamElements is a web-based tool that you can use to set up and manage your overlays, alerts, and other stream widgets. They also offer a bot that you can use to moderate your chat. In this guide, I'll primarily be focusing on the overlays and alerts.
To get started, visit the StreamElements website and log in by connecting StreamElements to Twitch.
Creating An Overlay
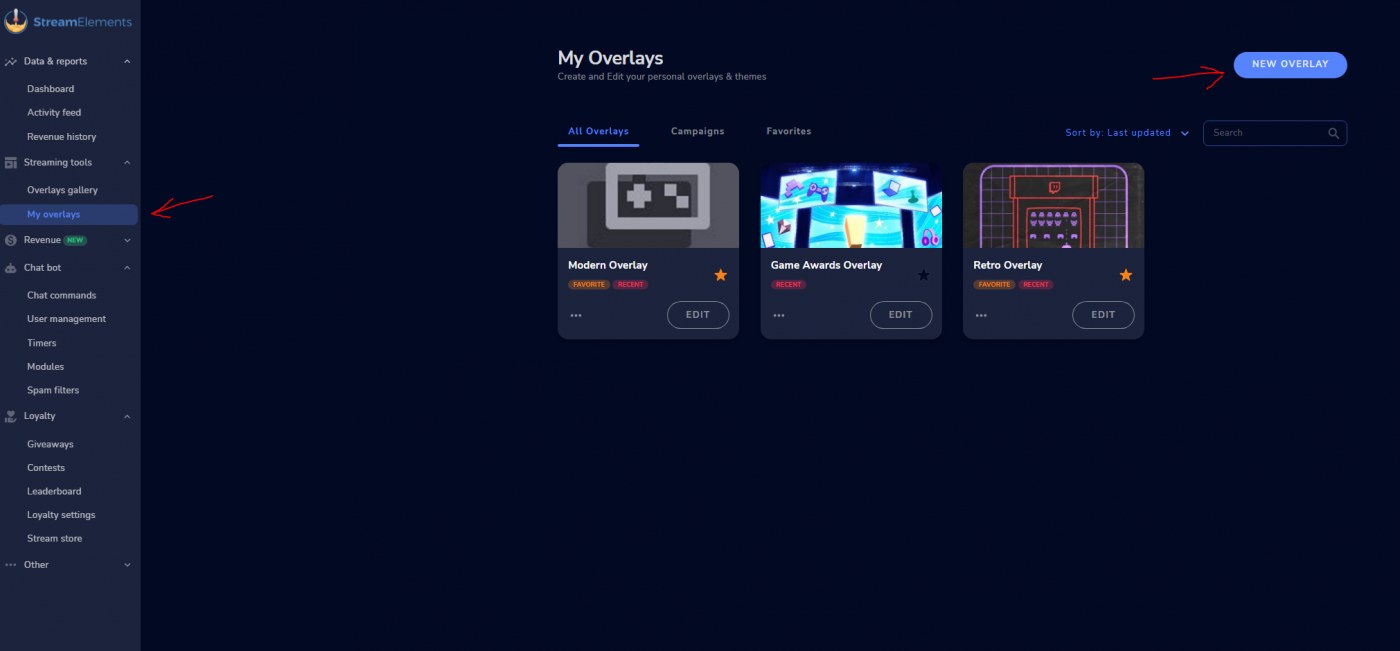
On top of providing a place to arrange your video sources, an overlay creates the visual identity of your stream. To get started creating one, click Create Overly under Streaming Tools > My Overlays (Figure 6). This guide will cover making a custom overlay, but if you want to take a shortcut, your other option is to select a pre-made one under Streaming Tools > Overlay Gallery. If you go this route, I recommend opting for a “Super Theme” overlay since it will include templates for multiple types of scenes.
Begin creating your overlay by setting the overlay resolution to match the base resolution you selected in OBS (1080, if you've been following this guide). From here, you'll have a blank canvas to work with; you'll populate this by adding widgets. In StreamElements speak, a “widget” is any visual element of your overlay. Click Add Widget or the + button to begin adding widgets. Here are a few basic ones to add:
- Overlay Mask – This is an image file that will serve as the frames for each of your video sources. This image should be the same resolution as your base resolution and have transparent cutouts for each of your video sources. To add one, navigate to Static/Custom > Image, and then Set Image > Upload. Then click your image, and select Submit. Once you have it visible in your overlay, stretch the mask to fill the entire canvas. See Figure 7 for an example of a very basic overlay mask.
- Avatar/Logo – You'll want to have something on screen that clearly identifies your channel as belonging to you in screenshots. To add an avatar or logo, use the same image uploading process as was used for adding an overlay mask. Once it appears on screen, drag it to your desired position and stretch it to an appropriate size. To make sure your logo is visible, check the Layers list on the lefthand side of the screen. The logo layer should be above the overlay mask layer.
- Chat Log – While purely optional, having your chat visible on the stream makes it easier for newcomers to join in the conversation since it allows them to see the coversation from before the point where they arrived. A chat log can be added tot he overlay by adding a Streaming Tool widget.

Once you've added widgets, they should be listed under the layers panel on the lefthand side of the screen. To rename a layer, double-click the layer name. You can reposition the layers by dragging and dropping them up and down the list. You can also lock them in place by clicking the lock icon. I recommend locking the Overlay Mask so that you don't accidentally drag it around when moving your other widgets. If you find that StreamElements won't let you move a widget even though it's unlocked, this is likely because your mask layer is sitting on top of it. Keep the mask layer on the bottom until you have everything else in position, then move it up to the top when you're done. At this point, the result should look like Figure 8.
Note: Don't forget to click Save in the top right corner once you have everything where you want it!

Adding Alerts
Alerts are the most commonly used dynamic element of an overlay. Their setup is more involved because you can assign unique graphics and sounds for each type of alert event (e.g. getting a new follower, receiving bits, etc). There are two ways to get started with alerts, the custom way, and the pre-made way.
- Custom Alerts – To add custom alerts navigate to + Button > Alerts > AlertBox. This will create an area within your overlay where alert graphics will appear when an alert is triggered. Under settings, you'll find that StreamElements will pre-populate your alert box with generic alerts for the most common events. To edit the graphics and sound for an alert, click the gear icon next to it. To disable an alert, uncheck the box the next to it.
- Pre-Made Alerts – If you want something more interesting than the defaults but don't want to create your own, this is the way to go. Within StreamElements main menu, you can find a library of pre-made alerts under Streaming Tools > Overlays Gallery > Alerts. Select one of the options by clicking Create and then Add To Existing Overlay > Continue, and then select the overlay you've been working on from the dropdown menu. After clicking Continue one more time, a window with a URL will appear. For the purposes of this guide, you can ignore this and instead return to the overlay editor to position the alert box that should now appear.
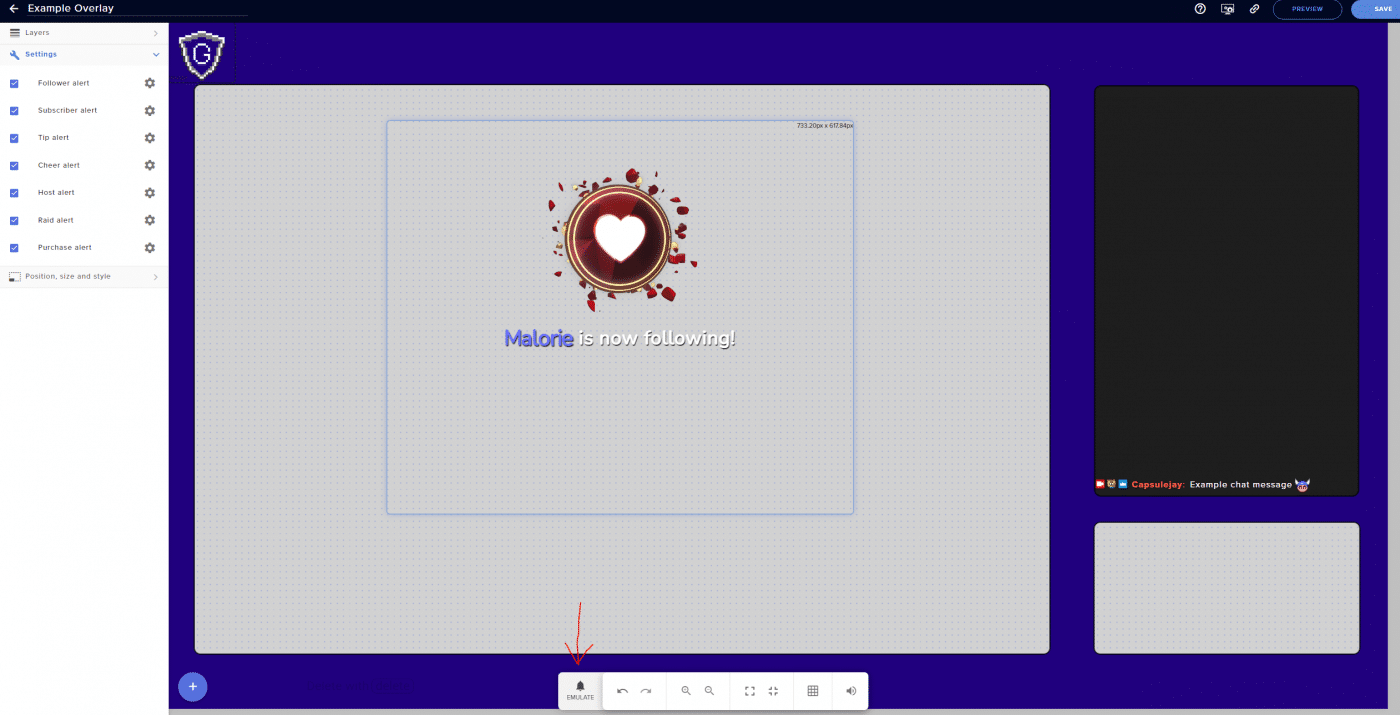
Once you have your alert box set up, you can test it by clicking the Emulate button in the toolbar at the bottom of the screen. You can use this to try out each type of alert you've set up. While you're running your tests, make sure that the alert box is set to being the top layer of your widget. This will ensure your alerts are always visible. Figure 9 shows the alert box displaying an emulated alert. Be sure to save when you're done testing.
Putting It All Together
With your sources added to OBS and your overlay and alerts setup in StreamElements, all that's left is to do bring these things together. Here's how to do that:
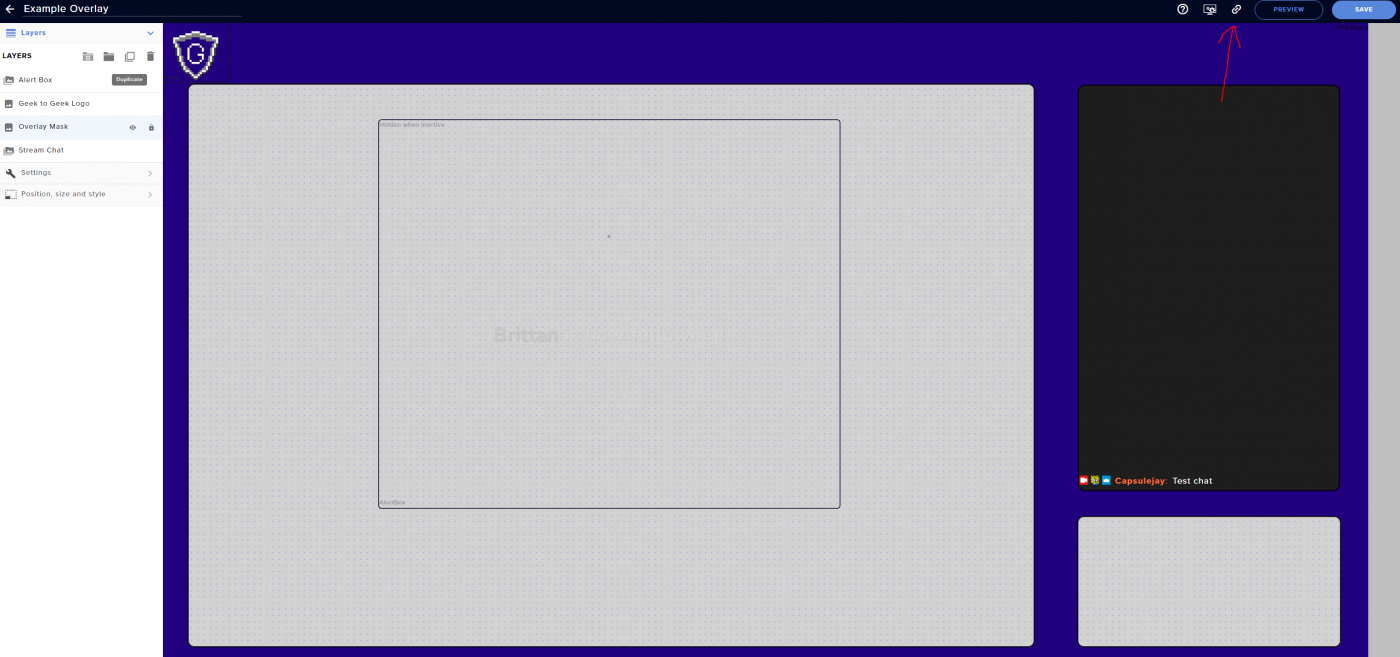
- In StreamElements overlay editor, copy the URL of the of overlay you want to use by clinking the link icon (Figure 10)
- Open up one of your scenes in OBS and create new a Browser source.
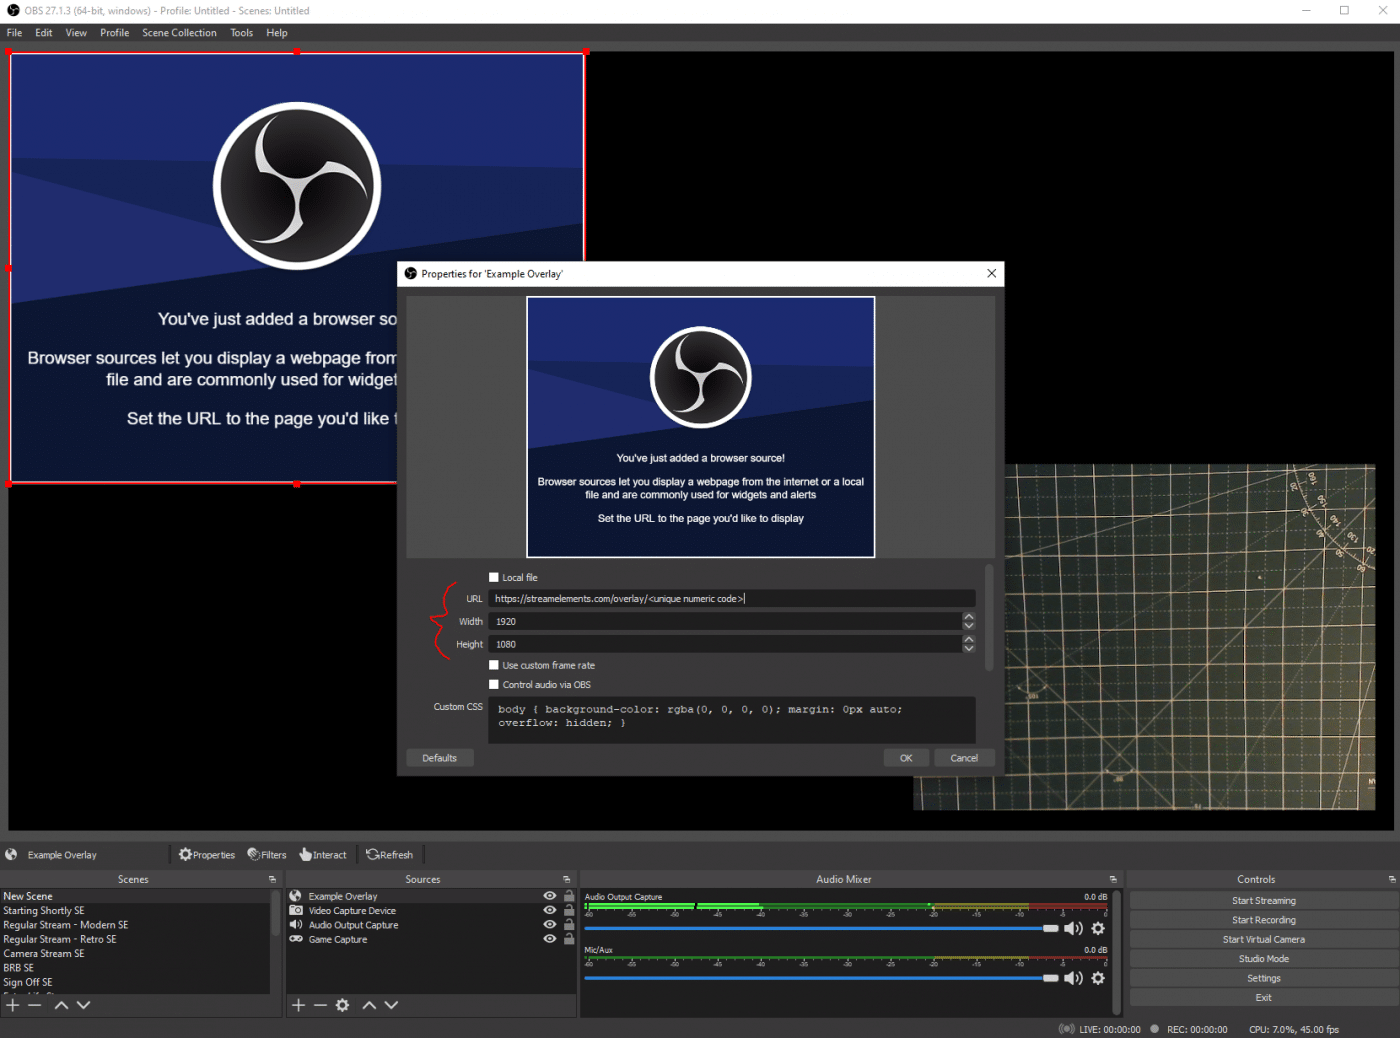
- Paste the overlay URL from StreamElements into the browser source properties and input your base resolution. (Figure 11)
- Make sure your overlay is the top layer and lock it in place.
- Open up a game and then open your Game Capture or Window Capture properties. Set the Mode to “Capture Specific Window” and the select the game under Window. Click ok and the game should now appear within your scene. If you are using Display Capture, you can skip this step.
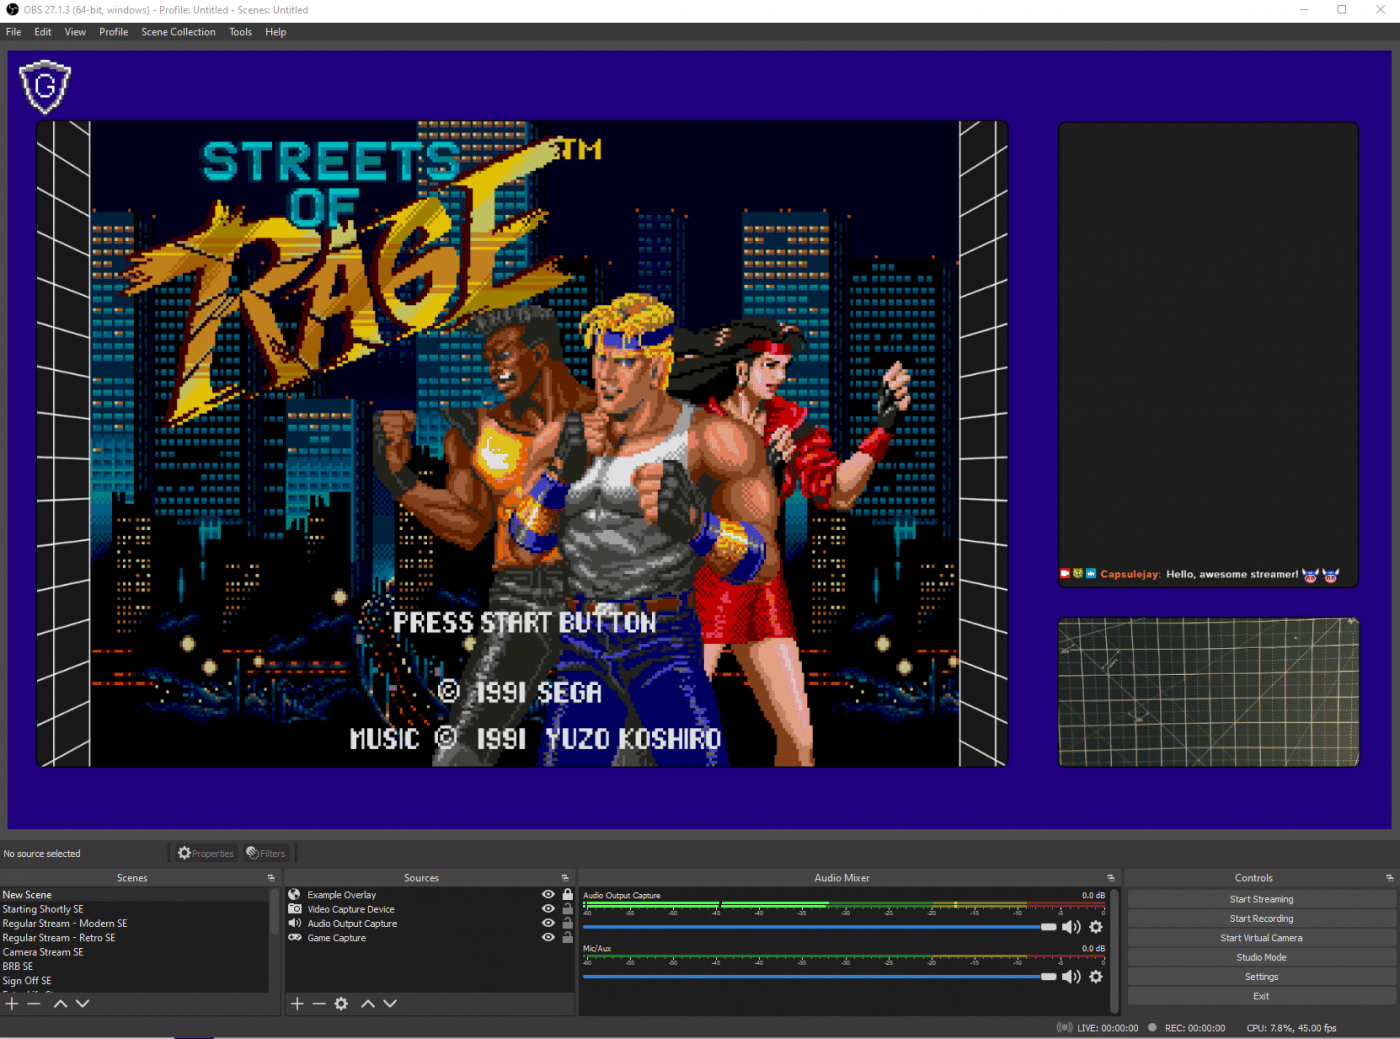
- Resize and repositon your game window and camera window as needed to so that they fit into your overlay's cutouts. I usually make my sources slighly larger than the cutouts within my overlay so that cutouts frame each source. (Figure 12)
