The Nintendo Switch just got a firmware update to 11.0.0 today, and while The Big N can be slow to iterate on modern features, they've finally given us something users have been wanting for ages:
Data Transfer.
Not migrating your games and saves from Switch to Switch, mind you; something even more basic. Now you can finally take your captured screenshots and videos and transfer them directly to another device, without using Twitter as a mule or shutting off the system to get at its notoriously poorly-organized microSD storage. What a concept!
Unfortunately, it's not the most intuitive, with different elements of the transfer feature living in different locations across the Switch's user interface. Fortunately, it doesn't require you to download any new apps to use, and if you know your way around, it can be a fairly smooth process.
Sending Switch Screenshots to Smartphone
While the method says “Send to Smartphone”, this will work with any modern phone or tablet, especially those running Android or iOS (so, something like 98% of devices). Unfortunately, you can only send one video or a set of up to ten screenshots at a time, but that should be enough for grabbing screenshots to text to a friend or when you don't have a PC with you.
The one thing you'll need is a QR code reader app on the smartphone or tablet that you're transferring to. Luckily, you almost certainly already have this!
If you're using an Android device, a QR code reader is built into the Lens feature of the default camera app you're probably already using (found on the rightmost screen of the camera app). On iOS, the Camera app should detect that a QR code is present and prompt you for the appropriate action. On either Android or iOS, you can find any number of free QR code readers on your system's app store.
Note that this will temporarily disconnect your phone from the internet, so make sure you're not in the middle of streaming music or doing some other major download!
The Method:
- Go to Album on the Switch home screen
- Select the screenshot or video you want to transfer, then hit [A] for Sharing and Editing and select Send to Smartphone
- If you're sending a screenshot, follow the on-screen choices to send just one screenshot or to pick up to ten to send all at once.
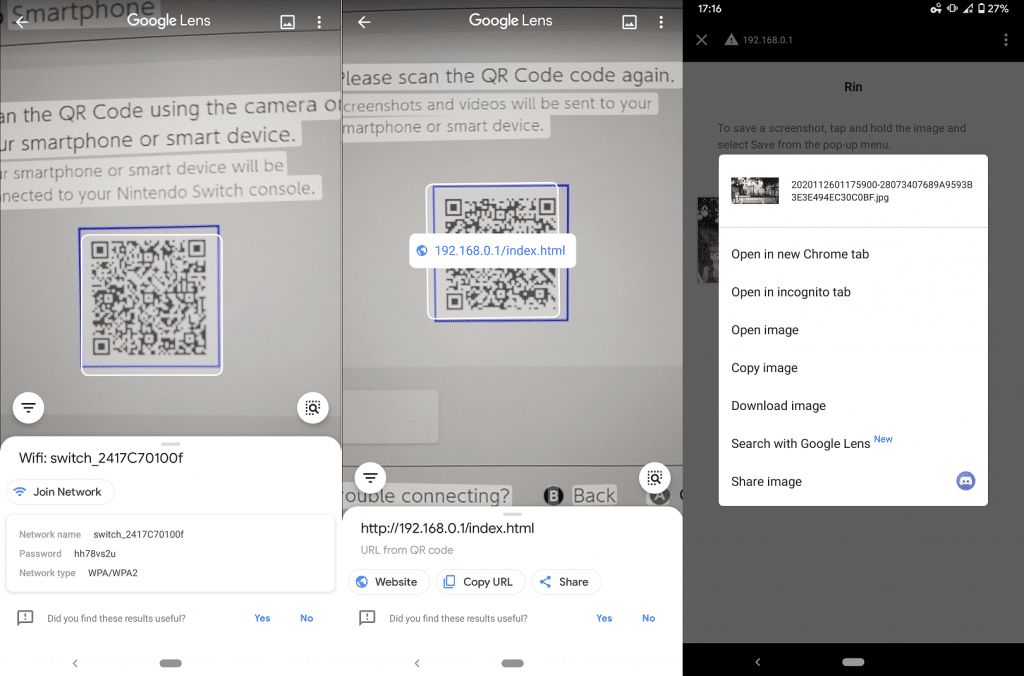
- A QR code will appear on the Switch screen. Scan this with your device and, when prompted, join the specified Wi-Fi network.
- A second QR code will appear on your Switch's screen. Return to your QR reader app and scan this QR code, which will give you a URL.
- Open this URL in your device's browser. You should see a page that has your Switch's device nickname, then a set of instructions followed by a gallery of your Switch screenshots and videos for transfer.
- If the page won't load and you're on a device with a mobile plan, you may need to temporarily disable mobile data.
- For each video or screenshot on the page, tap and hold on the item and select “Save to Device”.

That's it! You can now find each piece of media you saved in your device's Downloads folder. Select “End” on your Switch, and your device should automatically revert to whatever Wi-Fi connection you were using before – or, if you want to transfer more files directly to your phone or tablet, you can start the process again by selecting a new screenshot or video.
Sending Switch Screenshots to Other Devices
In a reversal from how you transfer files to your phone, the option to transfer your Switch screenshots and videos directly to a personal computer is a bit hard to find, but much easier to use – it's by far my preferred method of the two. Plus, there's no limit to the number of files you can transfer at once this way! This method is one-way, but it's absolutely the way to go for shutterbugs with a lot of screenshots and video backed up on their system.
The one thing you'll need for this method is a USB to USB-C cable. They don't come packaged with the Switch system itself, but most folks should have one around the house – and, if not, they're cheap and easy to find in most stores.
If you're moving a lot of files at once, you may want to first go to System Settings and Sleep Mode, then make sure Auto-Sleep (Playing on Console Screen) is set to at least half an hour. The process should be quick, but you still don't want to risk losing your connection in the middle of it!
The Method:
- Connect your undocked Switch to the PC you'll be transferring to via the USB cable.
- On your Switch, navigate under System Settings to Data Management.
- There, select Manage Screenshots and Videos.
- Finally, select the last option on the list, Copy to a Computer via USB Connection.

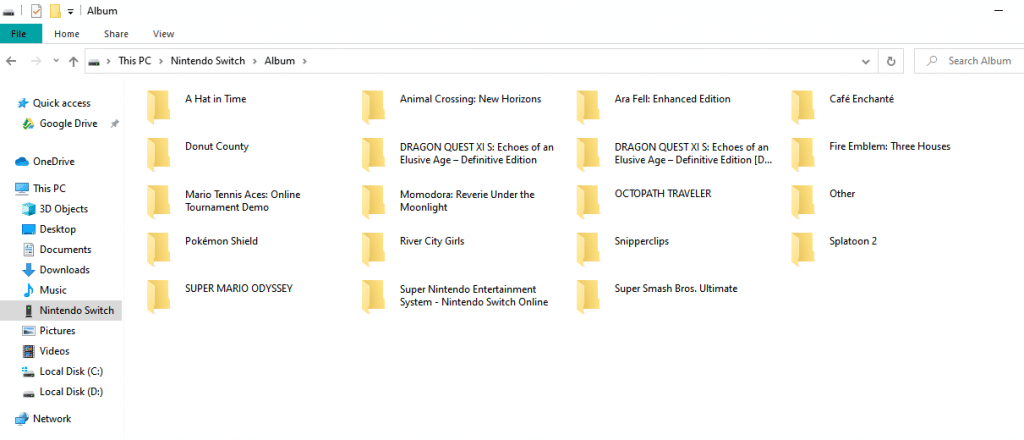
On your PC's file explorer, you should now see a device labeled “Nintendo Switch”. On that device, is a single entry named “Album”. All of your screenshots and videos are located here.

The top-level organization is fairly intuitive. Screenshots and videos for each game will be under a folder named after that specific game. Screenshots and videos you've taken of the console's system menus are located in “Other”.
Within each folder is a little trickier. Each file will be named for the exact time the screenshot or video was captured, with names matching the following format:
<Four-Digit Year><Month><Day><Hour, from 0-23><minute><second>00_s.<jpg or mp4>
So, if you get Pokémon Shield as a Christmas present and take a screenshot of your new best-friend-forever Sobble that afternoon, the file would be at:
Nintendo Switch/Album/Pokémon Shield/2020122513382900_s.jpg
…so I hope you remember what day you first found Marina singing to herself in Animal Crossing! Otherwise, you may need to copy them to the PC first before renaming them to something more friendly, since you can't alter any images that are still on the Switch.
Sticking Points
I've noticed that the Switch is creating its own Wi-Fi Hotspot. Can I just connect to the same one every time I want to do a transfer?
Although the Switch uses the same hot-spot name each time (hooray, your wi-fi connection history won't get clogged!), it generates a new password for each session, so you'll have to connect via QR again every time (boo, minor annoyances!).
Gee, are there any other shortcuts I can take with the transfer-to-smartphone method?
Yes! The Switch will host its media at the same address every time. If you bookmark the following address in your device's browser – or leave a tab open to it – you can go directly there and download your Switch's screenshots and videos as soon as you connect to its hotspot:
http://192.168.0.1/index.html
My phone or tablet can't bring up the webpage in the final step; the page gives me the error “ERR_CONNECTION_TIMED OUT”
This may happen with some LTE-enabled devices depending on your carrier. If you encounter this, once you have the URL and are trying to load the page, disable your mobile data to force your device to use wi-fi to load the page. You should now see your Switch's hosted media.
Can I transfer over USB from my Switch while it's docked?
The process only works when the Switch is undocked.
Questions? Comments?
While you can still manually transfer files from your Switch's microSD card to your PC using a valid adapter – or by posting to a super-secret Twitter account – the two options given in yesterday's Switch firmware update should handily serve most people's needs, especially the direct-over-USB method.
Did we leave anything out that could benefit from more explaining? What kind of digital scrapbooking are you going to do with these new features? We look forward to hearing from you in the comments!

